08 February 2006

Perspective Basics part I

Just finished seeing the Godfather trilogy, love those movies by the way, and I decided to scan some of the perspective drawings I made for this blog. The tracing of perspective is used vey often when drawing. That is the reason why all the theory and concepts of perspective should remian pretty clear for artists. Thanks to its application the artist will have a better understanding of the models and will be able to portrait different situations even without a model, but capturing the depth. It would be helpful for this matter, to imagine that there is a plane (the canvas plane) between the artist and the subject. The size of a projected object will decrease in size as the object moves farther from the plane. And at the same time it will be biggger if it comes closer. This means that equal measures of an object will vary depending their proximity to the plane. Fundamental elements of perspective These are the technical terms used when talking about perspective: Horizon - This line indicates the height of the artists eyes. It will vary depending at what height we are situated when drawing. Point of View - Represents the situation of the artist left or right of the model. The distance from this point to the horizon is called "visual distance". The perpendicular projection form the horizon is called the main point. Vanishing Points - They are located on the horizon and all the parallel lines on the model join in them. Types of Perspective (click to enlarge pics) 
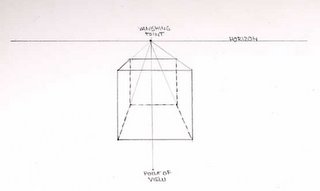
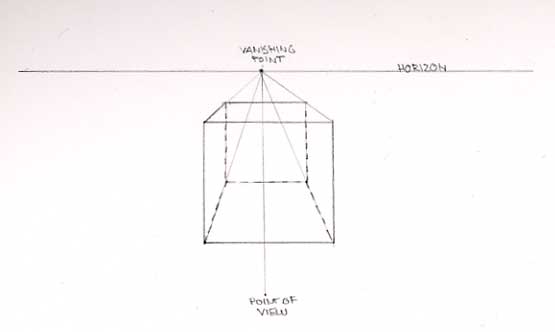
1. Depending on the position that the artist takes facing the model, we can distinguish 3 types of perspective. First we see the forntal or parallel perspective, this uses only one vanishing point, that coincides with the main point.
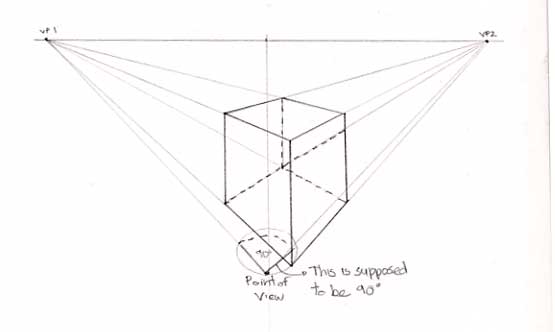
2. The two point perspective uses 2 vanishing points located on the horizon when you prolong a 90º angle having as the vortex the point of view. (The 90º measure is determined because the angle of the cube is 90º)
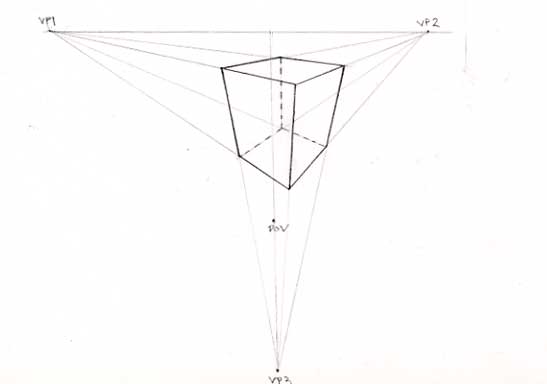
3. Finally the 3 point or aerial perspective uses 3 vanishing points. When the horizon is too low or too high, the lineas become distorted by perspective and we need an external third point in an auxiliary horizon.

31 January 2006

The Art of Pencil Drawing - Book Review

If you need those silly little breakdowns that some people think are teaching aids then go for a Hammond book or one of the lesser pencil artists because this gem is for the serious individual who wants to learn and master the technique of pencil drawing with values. Watson's writing is as precise and clear as is his drawings and it is here that you will find real teaching in the art of how to see and how to translate what you see into truly beautiful drawings. GET THIS BOOK FOR THE PICTURES , THE TEACHING AND ABOVE ALL THE EXAMPLES OF FRESH, CLEAN, BEAUTIFUL PENCIL WORK!!!!! His technique and use of a value palette of light to dark strokes from different grade pencils is nothing short of remarkable and his enthusiasum for the student learning the many so-called tricks of the trade is metered with wisdom and stunningly skillful examples of this available medium. I had this book at the beginning of my journey as an artist and I bought it here on Amazon in a fit of nostalgia. Well just the chapter on how to get into and out of a sketch gracefully was worth the price. I forgot how wonderful leaning over the shoulder of a real master was with all the systems and idot proof methods totally dependent on only photographs that proliferate this genre Well, this wonderful book brings pencil drawing back to its rightful place at the head of the artists list of cheap and marvelous tools. You have all the needed information plus the techniques for drawing clean clear crisp pencil work well illustrated and tempered by knowledgeable paragraphs on compoosition and lighting, handling your pencil with the spepcial point he shows how to make, as well as examples to follow and apply eventually in plein air sketching. Buy The Art of Pencil Drawing

For those of us who love comics

I know some of you out there love comics. Hey! I love comics myself :) So I'm leaving you a link to a Step by Step Process of the making of A Copper Comic by Kazu Kibuishi. It's really useful an amazing to see, you go from the first phase after the ide is donde to the finishing touches and color in a digital medium. Copper Step-by-Step

19 January 2006

Facial Expresion Anatomy - Artnatomy

I found this wonderful website, a site you can't miss if you are serious about drawing faces. Artnatomia is a spanish website developed by Fine Arts students and figure drawing artists. The creator of the site is Victoria Contreras Flores and the site allows to locate the head muscles that are involved in facial expressions. It is made in flash, and it is completely interactive,with detailed descriptions. Jewels like this are found in websites form all countries, but don't worry it has an english translation. ;)

18 January 2006

Stuck in Drawing

Have you ever reached a point where you think you are not drawing any better? Chances are you are wrong. Sometimes you just need to take a look at your drawing form the past months to check on reality. But…well sometimes you indeed are stuck in the evolution of your drawing or walking the line too slow.

Why does this happen? Well, yesterday I read a little of Glenn Vilppu’s Drawing Manual ( I tried to read more but I was just too tired ) and it said something very true. Learning to draw is a process, in order to make really great drawings we have to build our skills layer by layer, we can’t pretend to make a finished masterpiece if we have no knowledge of lighting, structure, composition, etc. And we have to consider that understanding lighting, structure, composition, etc involves having previous basic knowledge. So..think it as layers. Maybe your drawing does look awful because you concentrate too much on rendering completely ignoring underlying structure, relationships and proportions. Even revisiting the most basic steps can be of great help. Just take it slow, be patient with yourself. Vilppu says make a plan, and if that’s true in anything in life to reach a certain goal, you certainly can do it with drawing.

Don’t put too much stress on yourself and you will see that your skill will be building itself almost naturally, and you will enjoy drawing like never before.

Should you go to a figure drawing class?

I’m struggling to find some time to attend a figure drawing workshop, but I have too many things going on right now. I haven’t been drawing that much for the past two weeks, which has me a little bit anxious. And people ask me—Why would you want to go to a figure drawing workshop?? Can’t you just draw from pictures?

It’s true, I could just draw from pictures, but I found that it is not the same. When you are working from a live model, you get to see so many different things that you just miss on a picture. Mainly because you are on a multidimensional environment and also because your senses are more alerted because of time constraints. A true teacher can help you understand any problem you encounter when trying to translate the forms to a paper.

The lighting is another goodie of a figure drawing workshop. When you work with pictures, say magazine pictures, most of the time they have multiple light sources and you can’t truly appreciate the form in all its volume. Have you seen this photographs, where the model just looks flat?? –yes, multiple light sources.

A figure drawing class is a whole different experience than drawing just from pictures, and if you’re serious about learning to draw you should attend one. Plus you could make some good friends there ;)

13 January 2006

10 Things You Can Do To Overcome Your Fear To Drawing

by Jeff Rosales

If you have always had the desire of learning how to draw, the only thing from stopping you is yourself and your fears.

Fear of failure is a powerful barrier to overcome before we can achieve our goals. If you want to learn to draw, but are afraid to do so, you must learn to overcome your fear, and you do that by confronting it.

But don't get me wrong here. You shouldn't just go to the town's art supply shop and buy all your equipment and try to develop a masterpiece from the word "go". That would be like confronting the school bully with no mental or physical preparation....

There are 10 things I can recommend to overcome your fear to draw. You can do one, or as many as you want:

1. As Nike's slogan goes: "Just Do It!" Make a decision to start learning how to draw, and start your research to get familiar with terms, tools, materials and techniques. You could start by visiting my site (www.Learn-to-Draw-and-Paint.com) where I have a growing collection of free articles, tips and techniques on drawing and painting. That's a good start! ;-)

2. Get some basic drawing equipment. It sounds expensive, but it does not have to be. To begin with, you can start by getting a pencil, a drawing pad, an eraser and maybe a ruler. If you have access to discarded photocopy paper, you could "recycle" it by drawing on the blank side of the paper.

3. Re-wire your brain in relation to drawing. This is perhaps the most important thing you can do to overcome your fear of drawing (or any other fear, for that matter!). Drawing is just a skill, and there is nothing preventing you from learning anything whatsoever. Anyone can bake a cake! Just follow instructions and easy to follow steps, and the result will show. Once you convince yourself of this, learning to draw will be easier than you think.

4. Go slowly but steady: Unless you're some sort of genius, if you're a normal mortal like the rest of us, you should start from the most basic exercises and techniques, and build upon the following steps, until you are sufficiently skilled to draw something you can be proud of.

5. Don't be too critical of your drawings. Remember, you are learning something here. You are not expected to produce a facsimile copy of whatever object at your early stages of your drawing "apprentiship". You are expected to do your exercises well. That's all.

6. Understand that most of the basic skills you'll learn are so basic that a child could learn them, and so will you. You start by learning to draw simple shapes, how to hold your pencil, different pencil strokes, and gradually moving onto drawing stick figures, learning about shading, proportions, perspective, and that kind of thing. It may sound overwhelming... but it doesn't have to be.

How do you eat an elephant? A/ One bite at the time! That's how you learn to draw too!

7. Develop a learning routine. Depending on your time commitments, you could set aside an hour or so a week to learn new concepts and practice new skills. This is also important because doing so will ensure that you keep your interest alive. An enjoyable commitment to ongoing learning will build up your skills rapidly.

8. As Yoda says: "Practice you need." A few weeks ago I watched a TV interview of famous Australian Guitar Player Tony Emanuell. This guy has been playing the guitar since he was 4! When the journalist asked him how did he get that good, Tony's answer was: "I played the guitar more than I eat, sleep, talk, and go to the toilet. When you do something over and over you got to get good at it" [or words to that effect].

You get back what you put in. If you just want to learn to draw, you should practice regularly. If you want to become a master... you know what to do.

9. Do a drawing course if you can. Sure, you can learn to draw from books. But to take your skills to the next level, you should do a course at your local community school, summer school, or even online.

10. Keep a record of your progress. I do my exercises on lose paper, and my practice drawing on a pad. That way, I keep a record of my progress.

You will be amazed at how good you get at drawing if you keep records of your early work and compare it to the latest drawing. This translates into a confidence boost which will help you keep going.

I hope you find these tips useful, and I wish you all the best in your artistic learning journey.